Nutanix CE の Nutanix Guest Tools(NGT)を、Oracle Linux 8.5 にインストールしてみます。
今回の内容です。
NGT ISO イメージ ファイルのマウント
NGT をインストールする VM に、Prism でインストーラの ISO イメージ ファイルをマウントしておきます。
あらかじめ VM には、空の CD ドライブを追加しておきます。
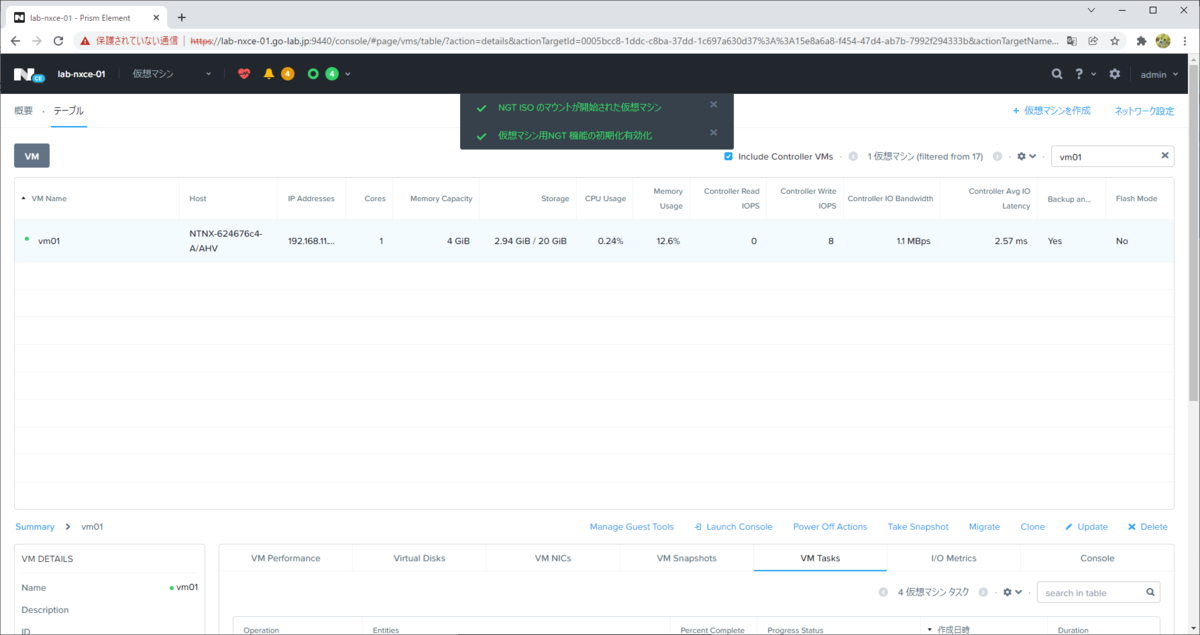
Prism の「仮想マシン」→「テーブル」を開きます。そして、「Manage Guest Tools」をクリックして、「Enable Nutainx Guest Tools」と「Mount Nutainx Guest Tools」のチェックをオンにして、「Submit」をクリックします。

これで、VM に ISO がマウントされました。

Linux での NGT インストール
NGT の ISO イメージ ファイルをマウントした Linux VM に SSH ログインして、インストールを進めます。
[root@vm01 ~]# cat /etc/oracle-release
Oracle Linux Server release 8.5
Linux OS 側でも、ISO イメージ ファイルをマウントします。今回は /mnt ディレクトリにマウントします。
[root@vm01 ~]# mount /dev/cdrom /mnt
mount: /mnt: 警告: デバイスは書き込み禁止です、読み込み専用でマウントします.
[root@vm01 ~]# ls /mnt
autorun.inf  config  installer  ngt_autorun.ico  rr_moved  setup.exe
Minimal Install の Oracle Linux 8 では、この時点では python に PATH が通っていません。そのため、Python の環境を準備しつつインストールする setup_python.sh スクリプトで、NGT をインストールします。しかし実行すると、tar コマンドもインストールされていないためエラーになります。
[root@vm01 ~]# /mnt/installer/linux/setup_python.sh
/mnt/installer/linux/setup_python.sh: 行 10: tar: コマンドが見つかりません
ERROR: Failed to install Nutanix Guest Tools. Check /tmp/ngt_install_log_20211224223713.txt  for logs.
tar コマンドをインストールします。
[root@vm01 ~]# dnf install -y tar
あらためて、NGT をインストールします。今度はインストールできました。
[root@vm01 ~]# /mnt/installer/linux/setup_python.sh
Using Linux Installer for red hat enterprise linux linux distribution.
Setting up Nutanix Guest Tools - VM mobility drivers.
Successfully set up Nutanix Guest Tools - VM mobility drivers.
Installing Nutanix Guest Agent Service.
Successfully installed Nutanix Guest Agent Service.
Installing Nutanix Self Service Restore Service.
Successfully installed Nutanix Self Service Restore Service.
Waiting for Nutanix Guest Agent Service to start...
Waiting for Nutanix Self Service Restore Service to start...
Nutanix Guest Agent Service successfully started in the background.
Nutanix Self Service Restore Service successfully started in the background.
ngtcli.py の実行
setup_python.sh スクリプトでは、Python のパッケージ インストールや alternatives 設定は実施されていません。そのため、ngtcli.py を実行すると「python」が見つからずにエラーになります。
[root@vm01 ~]# /usr/local/nutanix/ngt/ngtcli/ngtcli.py
/usr/bin/env: `python': そのようなファイルやディレクトリはありません
この時点では、alternatives の「python」設定が /usr/libexec/no-python になっていて、とくに Python のバイナリが指定されていません。しかし、システムむけの /usr/libexec/platform-python を利用するのは微妙な気がします。
[root@vm01 ~]# alternatives --list
libnssckbi.so.x86_64    auto    /usr/lib64/pkcs11/p11-kit-trust.so
python                  auto    /usr/libexec/no-python
ifup                    auto    /usr/libexec/nm-ifup
cifs-idmap-plugin       auto    /usr/lib64/cifs-utils/cifs_idmap_sss.so
そこで、NGT に同梱されている python3 で ngtcli.py を実行してみました。バイナリは 2箇所にありますが、どちらも同じものです。
- /usr/local/nutanix/ngt/python36/python3
- /usr/local/nutanix/ngt/python36/bin/python3
[root@vm01 ~]# /usr/local/nutanix/ngt/python36/python3 /usr/local/nutanix/ngt/ngtcli/ngtcli.py
ngtcli> ngt fetch-capabilities
NGT Version      : 2.0
NGT Capabilities :
        VSS : 1
        Script Execution : 1
        Self Service Restore : 1
ngtcli> exit
[root@vm01 ~]# /usr/local/nutanix/ngt/python36/bin/python3 /usr/local/nutanix/ngt/ngtcli/ngtcli.py
ngtcli> ngt fetch-capabilities
NGT Version      : 2.0
NGT Capabilities :
        VSS : 1
        Script Execution : 1
        Self Service Restore : 1
NGT サービス登録(service → systemctl)
NGT のインストール直後は、/etc/rc3.d 配下などのファイルによる、古めの方式でサービスが起動されているようです。
Systemd に登録しておいた方が分かりやすそうなので、systemctl enable で登録しておきます。これで、systemctl start / systemctl status といったコマンドでも管理できるようになります。
[root@vm01 ~]# systemctl enable ngt_guest_agent
[root@vm01 ~]# systemctl enable ngt_self_service_restore
以上。
