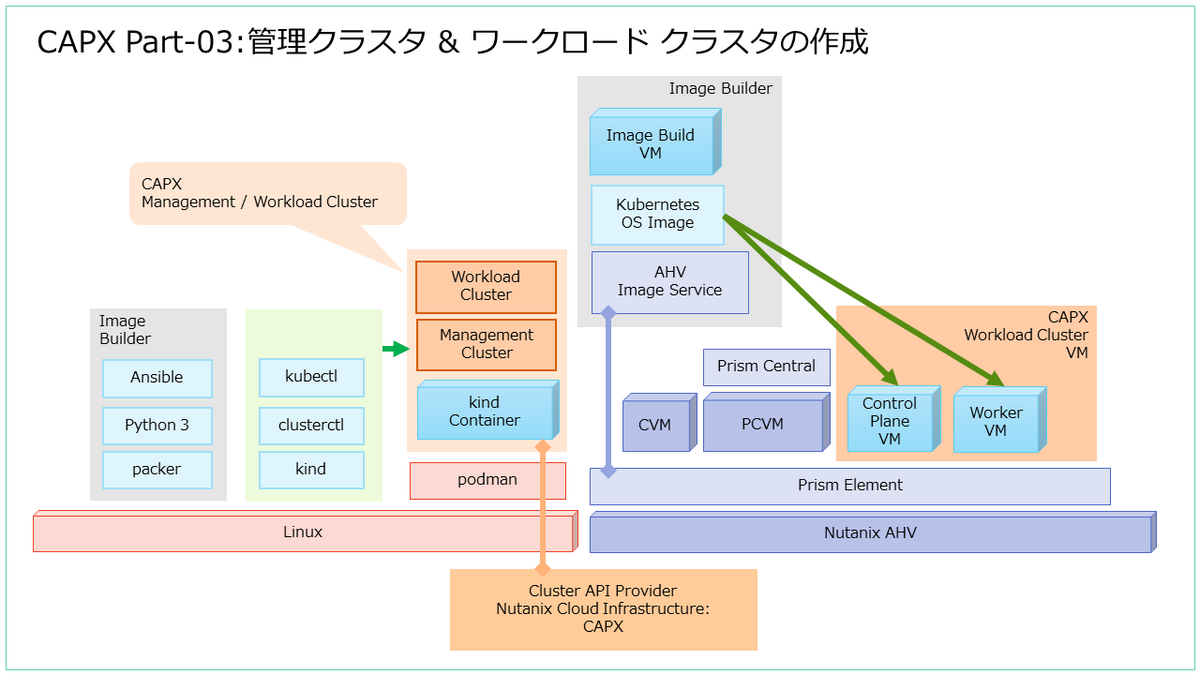
CAPX(Cluster API Provider Nutanix Cloud Infrastructure)で、Nutanix CE に Kubernetes 環境を構築してみます。今回は、CAPX クラスタを作成します。
入口はこちら。
前回(前提とになるツール群のインストール)はこちら。
今回の内容です。
- 1. kind クラスタの作成(管理クラスタ用)
- 2. SSH キー ペアの作成
- 3. 環境設定(clusterctl.yaml)
- 4. 管理クラスタの作成
- 5. ワークロード クラスタの作成
- 6. クラスタの削除
1. kind クラスタの作成(管理クラスタ用)
まずは、Cluster API の管理クラスタにする Kubernetes クラスタを、kind で作成します。
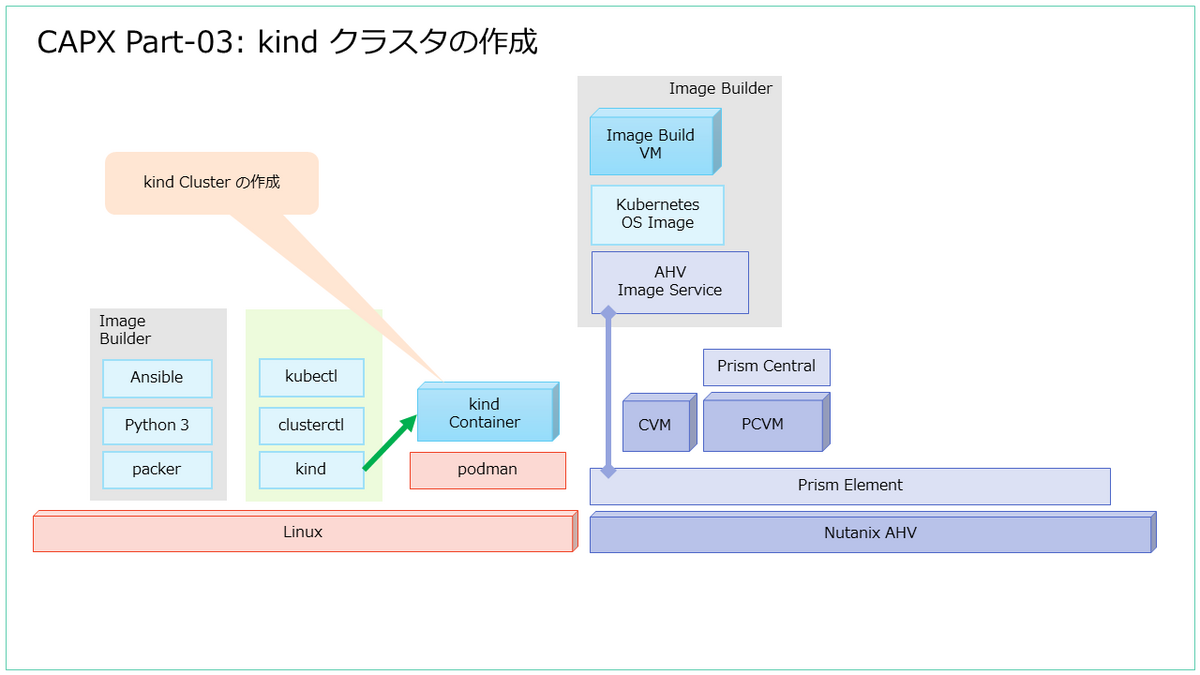
「kind create cluster」コマンドを実行すると、podman コンテナとして Kubernetes クラスタが作成されます。
# kind create cluster
enabling experimental podman provider
Creating cluster "kind" ...
 ? 偲nsuring node image (kindest/node:v1.27.3) ?
 ? πreparing nodes ?
 ? Writing configuration ?
 ? 袴tarting control-plane ?刻?
?? 孤nstalling CNI ?
?? Installing CNI ?
?? Installing CNI ?
?? Installing CNI ?
?? Installing CNI ?
?? Installing CNI ?
?? Installing CNI ?
?? Installing CNI ?
?? Installing CNI ?
 ? Installing CNI ?

 ? 症nstalling StorageClass ?
肖et kubectl context to "kind-kind"
You can now use your cluster with:

kubectl cluster-info --context kind-kind

Thanks for using kind! ?

#
Kubernetes クラスタが作成されました。
# kubectl get nodes
NAME                 STATUS   ROLES           AGE   VERSION
kind-control-plane   Ready    control-plane   15h   v1.27.3
2. SSH キー ペアの作成
CAPX Kubernetes クラスタのノードになる仮想マシンに渡す SSH キーペア(の公開鍵)を作成します。
# ssh-keygen -P '' -f ~/.ssh/id_rsa
作成されたファイルのうち、公開鍵は id_rsa.pub ファイルに含まれます。
# ls $HOME/.ssh/id_rsa*
/root/.ssh/id_rsa  /root/.ssh/id_rsa.pub
3. 環境設定(clusterctl.yaml)
CAPX のパラメータは、環境変数でも設定できるようですが、今回は下記のようにファイルを作成して記載しておきます。
$HOME/.cluster-api/clusterctl.yaml
下記のように、ディレクトリと clusterctl.yaml ファイルを作成します。
# mkdir $HOME/.cluster-api
# vi $HOME/.cluster-api/clusterctl.yaml
4. 管理クラスタの作成
kind で作成した Kubernetes クラスタを、CAPX の管理クラスタにします。
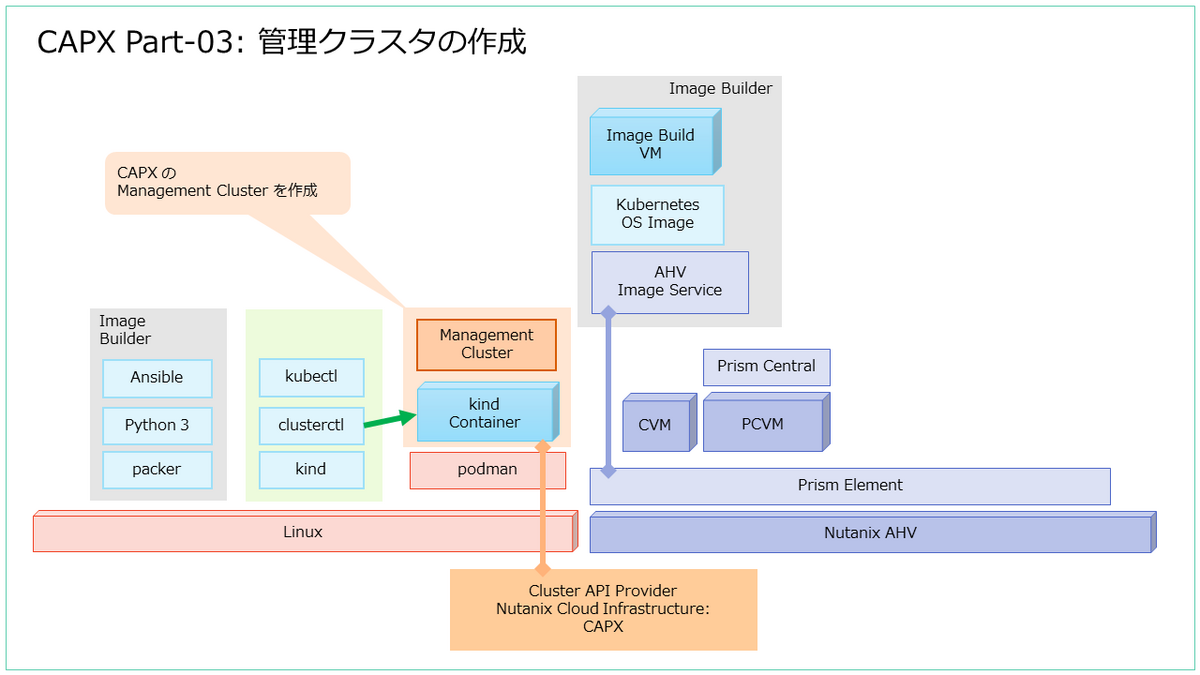
「clusterctl init -i nutanix」コマンドで、管理クラスタを作成します。
# clusterctl init -i nutanix
Fetching providers
Installing cert-manager Version="v1.13.2"
Waiting for cert-manager to be available...
Installing Provider="cluster-api" Version="v1.6.0" TargetNamespace="capi-system"
Installing Provider="bootstrap-kubeadm" Version="v1.6.0" TargetNamespace="capi-kubeadm-bootstrap-system"
Installing Provider="control-plane-kubeadm" Version="v1.6.0" TargetNamespace="capi-kubeadm-control-plane-system"
Installing Provider="infrastructure-nutanix" Version="v1.2.4" TargetNamespace="capx-system"

Your management cluster has been initialized successfully!

You can now create your first workload cluster by running the following:

  clusterctl generate cluster [name] --kubernetes-version [version] | kubectl apply -f -

#
管理クラスタには、下記のような Nutanix のリソースも作成できるようになっています。
# kubectl api-resources --api-group=infrastructure.cluster.x-k8s.io
NAME                      SHORTNAMES   APIVERSION                                NAMESPACED   KIND
nutanixclusters           ncl          infrastructure.cluster.x-k8s.io/v1beta1   true         NutanixCluster
nutanixmachines           nma          infrastructure.cluster.x-k8s.io/v1beta1   true         NutanixMachine
nutanixmachinetemplates   nmtmpl       infrastructure.cluster.x-k8s.io/v1beta1   true         NutanixMachineTemplate
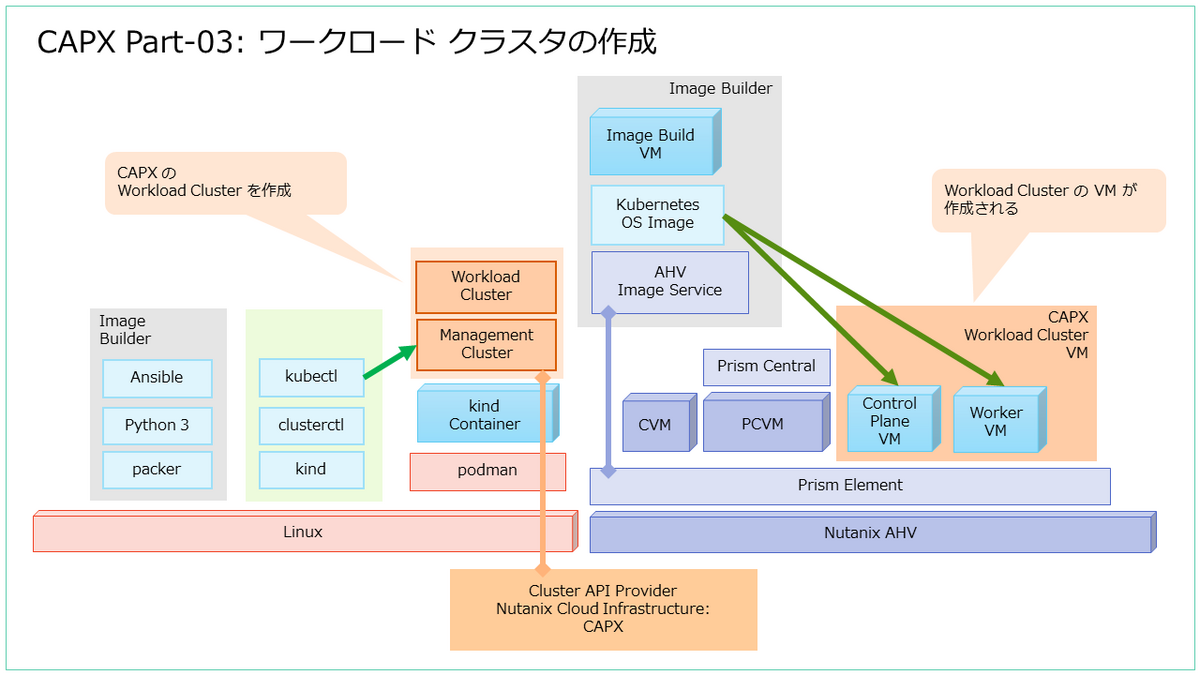
5. ワークロード クラスタの作成
管理クラスタに、CAPX のワークロード クラスタを作成します。
5-1. ワークロード クラスタの作成
クラスタを作成します。
# clusterctl generate cluster capx01 --kubernetes-version v1.26.7 | kubectl apply -f -
configmap/user-ca-bundle created
secret/capx01 created
kubeadmconfigtemplate.bootstrap.cluster.x-k8s.io/capx01-kcfg-0 created
cluster.cluster.x-k8s.io/capx01 created
machinedeployment.cluster.x-k8s.io/capx01-wmd created
machinehealthcheck.cluster.x-k8s.io/capx01-mhc created
kubeadmcontrolplane.controlplane.cluster.x-k8s.io/capx01-kcp created
nutanixcluster.infrastructure.cluster.x-k8s.io/capx01 created
nutanixmachinetemplate.infrastructure.cluster.x-k8s.io/capx01-mt-0 created
しばらくすると、Prism で仮想マシンが作成され、Kubernetes クラスタが作成されます。
5-2. CAPX クラスタとノードの確認
Cluster API によるクラスタは、cluster リソースとして管理されます。
# kubectl get cluster
NAME     CLUSTERCLASS   PHASE         AGE     VERSION
capx01                  Provisioned   9m42s
CAPX では、さらに nutanixcluster リソースが作成されます。
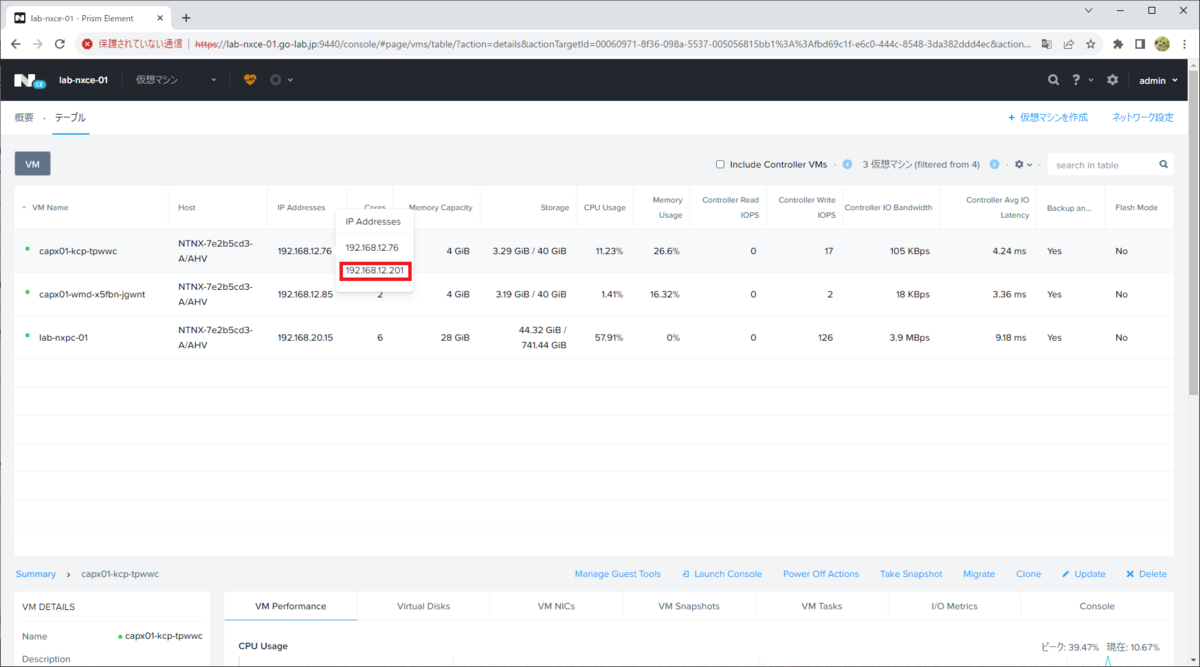
# kubectl get nutanixcluster
NAME     CONTROLPLANEENDPOINT   READY
capx01   192.168.12.201         true
Cluster API での仮想マシンのプロビジョニング状態は、machine リソースで確認できます。
# kubectl get machine
NAME                     CLUSTER   NODENAME                 PROVIDERID                                       PHASE     AGE     VERSION
capx01-kcp-tpwwc         capx01    capx01-kcp-tpwwc         nutanix://fbd69c1f-e6c0-444c-8548-3da382ddd4ec   Running   9m45s   v1.26.7
capx01-wmd-x5fbn-jgwnt   capx01    capx01-wmd-x5fbn-jgwnt   nutanix://5e3c1df3-b1c9-4ef9-9852-66df910eb916   Running   10m     v1.26.7
CAPX では、さらに nutanixmachine リソースが作成されます。
# kubectl get nutanixmachine
NAME                ADDRESS         READY   PROVIDERID                                       NODEREF
capx01-mt-0-74qhj   192.168.12.76   true    nutanix://fbd69c1f-e6c0-444c-8548-3da382ddd4ec   capx01-kcp-tpwwc
capx01-mt-0-z88jk   192.168.12.85   true    nutanix://5e3c1df3-b1c9-4ef9-9852-66df910eb916   capx01-wmd-x5fbn-jgwnt
この仮想マシンが作成されたことは、Prism Element などでも確認できます。
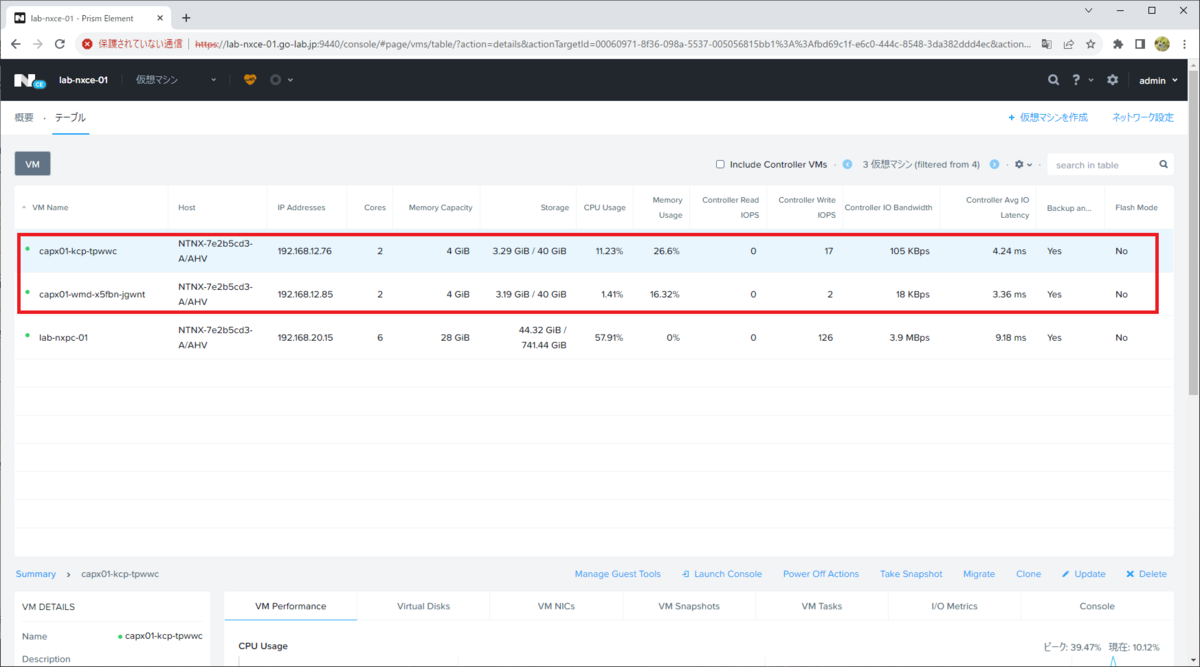
CONTROL_PLANE_ENDPOINT_IP として指定した IP アドレスは、Control Plane 仮想マシン(<CAPX クラスタ名>-kcp-<文字列>)に設定されています。
5-2. ワークロード クラスタへの接続
ワークロード クラスタの kubeconfig を取得します。
# clusterctl get kubeconfig capx01 > kubeconfig.capx01
ワークロード クラスタのノードです。
# kubectl --kubeconfig=kubeconfig.capx01 get nodes
NAME                     STATUS     ROLES           AGE   VERSION
capx01-kcp-tpwwc         NotReady   control-plane   11m   v1.26.7
capx01-wmd-x5fbn-jgwnt   NotReady   <none>          10m   v1.26.7
Pod を確認すると、coredns が Pending になっています。Pod の起動を進めるために、CNI をインストールします。
# kubectl --kubeconfig=kubeconfig.capx01 get pod -A
NAMESPACE     NAME                                       READY   STATUS    RESTARTS   AGE
kube-system   coredns-787d4945fb-lfjg4                   0/1     Pending   0          12m
kube-system   coredns-787d4945fb-zf8sh                   0/1     Pending   0          12m
kube-system   etcd-capx01-kcp-tpwwc                      1/1     Running   0          12m
kube-system   kube-apiserver-capx01-kcp-tpwwc            1/1     Running   0          12m
kube-system   kube-controller-manager-capx01-kcp-tpwwc   1/1     Running   0          12m
kube-system   kube-proxy-cv65s                           1/1     Running   0          12m
kube-system   kube-proxy-p5pwn                           1/1     Running   0          10m
kube-system   kube-scheduler-capx01-kcp-tpwwc            1/1     Running   0          12m
kube-system   kube-vip-capx01-kcp-tpwwc                  1/1     Running   0          12m
5-3. CNI のインストール(Calico)
今回は、CNI として Calico をインストールします。まず、tigra-operator をインストールします。
# kubectl --kubeconfig kubeconfig.capx01 create -f https://raw.githubusercontent.com/projectcalico/calico/v3.26.4/manifests/tigera-operator.yaml
namespace/tigera-operator created
customresourcedefinition.apiextensions.k8s.io/bgpconfigurations.crd.projectcalico.org created
customresourcedefinition.apiextensions.k8s.io/bgpfilters.crd.projectcalico.org created
customresourcedefinition.apiextensions.k8s.io/bgppeers.crd.projectcalico.org created
customresourcedefinition.apiextensions.k8s.io/blockaffinities.crd.projectcalico.org created
customresourcedefinition.apiextensions.k8s.io/caliconodestatuses.crd.projectcalico.org created
customresourcedefinition.apiextensions.k8s.io/clusterinformations.crd.projectcalico.org created
customresourcedefinition.apiextensions.k8s.io/felixconfigurations.crd.projectcalico.org created
customresourcedefinition.apiextensions.k8s.io/globalnetworkpolicies.crd.projectcalico.org created
customresourcedefinition.apiextensions.k8s.io/globalnetworksets.crd.projectcalico.org created
customresourcedefinition.apiextensions.k8s.io/hostendpoints.crd.projectcalico.org created
customresourcedefinition.apiextensions.k8s.io/ipamblocks.crd.projectcalico.org created
customresourcedefinition.apiextensions.k8s.io/ipamconfigs.crd.projectcalico.org created
customresourcedefinition.apiextensions.k8s.io/ipamhandles.crd.projectcalico.org created
customresourcedefinition.apiextensions.k8s.io/ippools.crd.projectcalico.org created
customresourcedefinition.apiextensions.k8s.io/ipreservations.crd.projectcalico.org created
customresourcedefinition.apiextensions.k8s.io/kubecontrollersconfigurations.crd.projectcalico.org created
customresourcedefinition.apiextensions.k8s.io/networkpolicies.crd.projectcalico.org created
customresourcedefinition.apiextensions.k8s.io/networksets.crd.projectcalico.org created
customresourcedefinition.apiextensions.k8s.io/apiservers.operator.tigera.io created
customresourcedefinition.apiextensions.k8s.io/imagesets.operator.tigera.io created
customresourcedefinition.apiextensions.k8s.io/installations.operator.tigera.io created
customresourcedefinition.apiextensions.k8s.io/tigerastatuses.operator.tigera.io created
serviceaccount/tigera-operator created
clusterrole.rbac.authorization.k8s.io/tigera-operator created
clusterrolebinding.rbac.authorization.k8s.io/tigera-operator created
deployment.apps/tigera-operator created
tigera-operator の Pod が Running になりました。
# kubectl --kubeconfig=kubeconfig.capx01 get pod -n tigera-operator
NAME                               READY   STATUS    RESTARTS   AGE
tigera-operator-5db468f88d-r427r   1/1     Running   0          25s
そして、カスタム リソースを作成します。IP アドレス プールを変更する必要があるので、いったん YAML をダウンロードします。
curl -OL https://raw.githubusercontent.com/projectcalico/calico/v3.26.4/manifests/custom-resources.yaml
そして編集します。
$ vi custom-resources.yaml
YAML は下記のようになります。Installation リソースの spec.calicoNetwork.ipPools の配下にある cidr を、CAPX のデフォルトである 172.20.0.0/16、blockSize を 24 に変更しています。(12~13行目)
YAML からリソースを作成します。
# kubectl --kubeconfig kubeconfig.capx01 create -f custom-resources.yaml
installation.operator.tigera.io/default created
apiserver.operator.tigera.io/default created
これで、coredns などの Pod も Running になるはずです。ロードバランサは別途インストール・・・
# kubectl --kubeconfig=kubeconfig.capx01 get pod -A
NAMESPACE          NAME                                       READY   STATUS    RESTARTS   AGE
calico-apiserver   calico-apiserver-5c9f97b664-h2pq2          1/1     Running   0          3m50s
calico-apiserver   calico-apiserver-5c9f97b664-jstc7          1/1     Running   0          3m50s
calico-system      calico-kube-controllers-59848fbd4f-44xvk   1/1     Running   0          5m25s
calico-system      calico-node-8ljnq                          1/1     Running   0          5m26s
calico-system      calico-node-xqsdf                          1/1     Running   0          5m26s
calico-system      calico-typha-84d65d99cb-5cg8k              1/1     Running   0          5m26s
calico-system      csi-node-driver-252hp                      2/2     Running   0          5m25s
calico-system      csi-node-driver-rzd2q                      2/2     Running   0          5m25s
kube-system        coredns-787d4945fb-lfjg4                   1/1     Running   0          21m
kube-system        coredns-787d4945fb-zf8sh                   1/1     Running   0          21m
kube-system        etcd-capx01-kcp-tpwwc                      1/1     Running   0          21m
kube-system        kube-apiserver-capx01-kcp-tpwwc            1/1     Running   0          21m
kube-system        kube-controller-manager-capx01-kcp-tpwwc   1/1     Running   0          21m
kube-system        kube-proxy-cv65s                           1/1     Running   0          21m
kube-system        kube-proxy-p5pwn                           1/1     Running   0          19m
kube-system        kube-scheduler-capx01-kcp-tpwwc            1/1     Running   0          21m
kube-system        kube-vip-capx01-kcp-tpwwc                  1/1     Running   0          21m
tigera-operator    tigera-operator-5db468f88d-r427r           1/1     Running   0          7m53s
6. クラスタの削除
今回の環境を削除していきます。管理クラスタ(kind による)のコンテキストで作業します。
# kubectl config use-context kind-kind
Switched to context "kind-kind".
capx01 という CAPX の Kubernetes クラスタが作成されています。
# kubectl get cluster
NAME     CLUSTERCLASS   PHASE         AGE   VERSION
capx01                  Provisioned   51m
CAPX のクラスタを削除します。Prism Central / Prism Element で確認していると、仮想マシンが削除されていきます。
$ kubectl delete cluster capx01
cluster.cluster.x-k8s.io "capx01" deleted
管理クラスタも削除しておきます。
# kind delete cluster
enabling experimental podman provider
Deleting cluster "kind" ...
Deleted nodes: ["kind-control-plane"]
つづくかもしれない。
